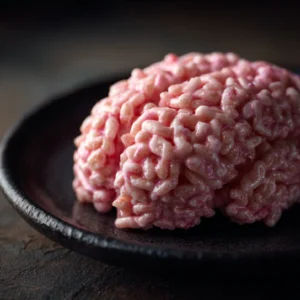
Looking for a spooky, sweet treat that’s quick to make and creepy enough to impress the whole Halloween crowd? These Marshmallow Rice Bubbles Halloween Brains are chewy, gooey, and slightly eerie, exactly what Halloween calls for. With just a few pantry ingredients and less than 30 minutes, you’ll have realistic brain-shaped bites that’ll have guests saying “Ew!” before grabbing seconds.
In this article, you’ll discover why this Halloween dessert will become a favorite, what you need to make it, how to shape the brains, and a few creative variations to make them even more fun. Whether you’re planning a party or a trick-or-treat night, these brains will be the star of your spooky spread.
Table of Contents
Why You Will Love This Marshmallow Rice Bubbles Halloween Brains Recipe
It’s Quick, Easy, and Gross in All the Right Ways
Hi, I’m Saly. I’m a home cook who’s all about keeping it simple, especially when it comes to fun seasonal recipes. When I first made these Halloween Brains, I didn’t expect them to be such a hit. But the combo of chewy marshmallow and crispy rice bubbles, shaped into weirdly realistic brains? My husband was equal parts disturbed and delighted. And that’s a Halloween win in my book.
You only need five ingredients. There’s no oven. And they come together in under 30 minutes, making this a brilliant no-bake Halloween dessert for busy families or last-minute party prep. Plus, kids love helping shape the “brains” (especially when they get to draw the spooky red veins with food coloring).
It’s the kind of recipe where the messier they look, the better they are. A little red food dye goes a long way in the creepiness department, and the gooey marshmallow holds everything together like edible glue. My favorite part? They’re just gross-looking enough to get people talking, but still taste like childhood joy in a bite.
Looking for more creepy Halloween sweets? These Halloween Eyeball Jello Shots make a perfectly spooky sidekick to your brains, and the Cheeseburger Skulls add a savory twist to balance out the sugar.
Whether you’re baking with little ghouls or need a showstopping treat for your Halloween table, these Halloween marshmallow brains are perfect. You’ll love the simplicity. You’ll love the reactions. And honestly? You’ll love how fast they disappear.
Print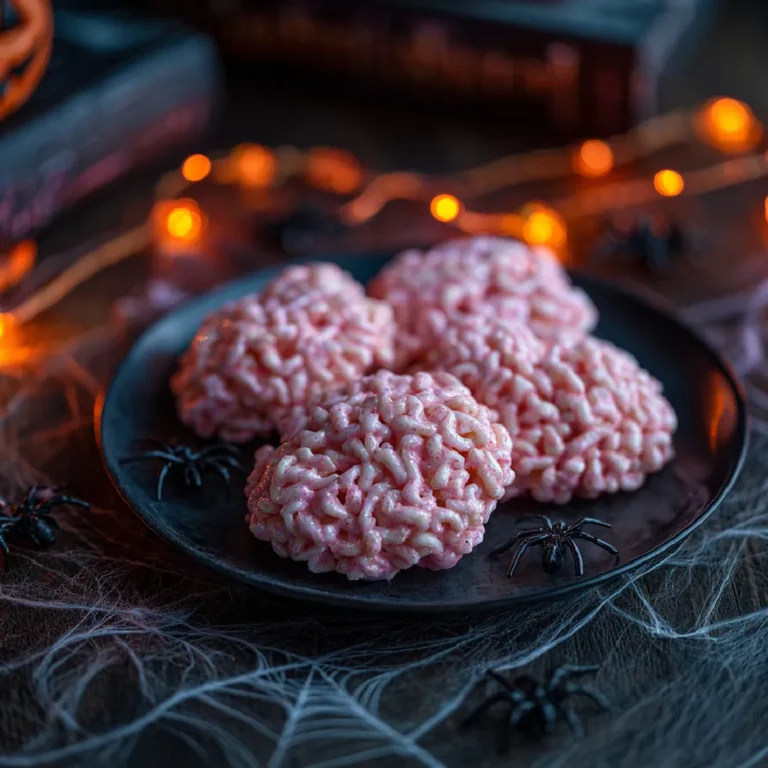
Marshmallow Rice Bubbles Halloween Brains
Creepy, chewy, and done in under 30 minutes, these Marshmallow Rice Bubbles Halloween Brains are the ultimate no-bake Halloween treat.
- Total Time: 20 minutes
- Yield: 14 servings 1x
Ingredients
85 g unsalted butter
6 cups regular marshmallows
4 cups Rice Bubbles (Krispies)
½ tsp salt Red food colouring
Instructions
1. Prepare a Bain-Marie with a heatproof bowl over boiling water.
2. Add butter and marshmallows. Stir until smooth.
3. Remove from heat. Add salt and red food colouring.
4. Pour over Rice Bubbles in a large bowl. Mix well.
5. Oil hands and shape into ovals.
6. Use knife to create center indent. Add red veins using toothpick.
7. Let cool and store in airtight container.
Notes
For extra spooky brains, use black or purple gel coloring for veins. Add a mini chocolate or gummy inside each brain for surprise centers.
- Prep Time: 10 minutes
- Cook Time: 5 minutes
- Category: Dessert
- Method: No-Bake
- Cuisine: Halloween
Nutrition
- Serving Size: 1 brain
- Calories: 149
- Sugar: 13.4g
- Sodium: 197mg
- Fat: 5g
- Saturated Fat: 3.1g
- Unsaturated Fat: 1.9g
- Trans Fat: 0g
- Carbohydrates: 25.8g
- Fiber: 0g
- Protein: 1.1g
- Cholesterol: 0mg
Ingredients for Marshmallow Rice Bubbles Halloween Brains
What You’ll Need to Make These Brains Come to Life
One of the best things about this recipe? The ingredient list is short and sweet — literally. You likely already have everything in your pantry. Just five simple items, and you’re on your way to creating one of the most fun no-bake Halloween treats ever. Here’s exactly what you’ll need:
| Ingredient | Amount |
|---|---|
| Unsalted butter | 85 g (about 6 tbsp) |
| Regular marshmallows | 6 cups (about 300 g) |
| Rice Bubbles (or Rice Krispies) | 4 cups |
| Salt | ½ tsp (skip if using salted butter) |
| Red food colouring | 1–2 drops (or as needed) |
If you’re new to baking with kids or hosting a DIY Halloween party, this is a great starter recipe because it’s flexible and forgiving. Want to give it a fruity twist? Try using strawberry-flavored marshmallows for a subtle flavor change and naturally pink hue.
And yes, this recipe works just as well with name-brand Rice Krispies or generic “rice bubbles.” Whatever you’ve got on hand will do the trick. If you’re curious how these ingredients stack up in other Halloween recipes, check out our Halloween recipes section for more creepy-yummy combos.
You’ll also need a few basic kitchen tools:
- A small saucepan
- A large heatproof bowl
- A whisk
- A mixing spoon
- A butter knife and toothpick (for the brain details)
Keep reading for step-by-step instructions on how to turn these humble ingredients into spooky, marshmallowy brains…
How to Make Marshmallow Rice Bubbles Halloween Brains
Step-by-Step Instructions for the Spookiest No-Bake Treat
This recipe comes together fast, so it’s best to prep everything ahead of time. Once the marshmallows melt, you’ll need to work quickly to mix and shape the mixture before it cools. Here’s exactly how to do it:
- 1. Prepare a double boiler (Bain-Marie): Fill a small pot with about ½ cup of water and bring it to a gentle boil. Place a large heatproof bowl on top of the pot; the bowl shouldn’t touch the water. This method helps you melt the marshmallows slowly without burning them.
- 2. Melt the butter and marshmallows: Add the unsalted butter and marshmallows into the bowl. Whisk continuously for 2–4 minutes until you get a smooth, gooey paste. You want it completely melted and silky.
- 3. Add color and salt: Once melted, carefully remove the bowl from heat using oven mitts or a towel. Stir in ½ teaspoon of salt and a few drops of red food coloring. Mix well until the entire mixture is evenly colored.
- 4. Coat the Rice Bubbles: In a large mixing bowl, add the Rice Bubbles. Pour the hot marshmallow mixture over them and quickly stir to coat every piece. You need to move fast here; once the marshmallow cools, it stiffens.
- 5. Shape your brains: Lightly oil your hands (or two spoons) to prevent sticking. Scoop up small amounts and mold them into ovals. Flatten them slightly and create a central indentation using the back of a butter knife to mimic the brain’s midline.
- 6. Add the “veins”: Dip a toothpick into red food coloring and draw squiggly lines over each brain to mimic bloody veins. The messier, the better; this is Halloween after all.
- 7. Let them set: Place the shaped brains on a lined tray. Let them cool at room temperature for 15–20 minutes. Once firm, transfer them to an airtight container. They’ll stay fresh for up to one week.
You can easily scale this recipe for a party; just double the quantities and give yourself a little more shaping time. I usually make a full batch the night before Halloween and store them alongside other party favorites from our Halloween Recipes collection.
Whether you’re decorating your Halloween dessert table or creating a spooky snack for movie night, this step-by-step method makes brain-making surprisingly fun and easy.
Tips and Variations for Perfect Halloween Brains
Make It Easier, Spookier, or Even Spicier
When I say this recipe is forgiving, I mean it. Still, a few extra tricks can make shaping your Marshmallow Rice Bubbles Halloween Brains a breeze, and even more realistic. Whether you’re working with kids, customizing for dietary needs, or just want a little wow-factor, these tips and twists will help you level up your Halloween treats.
Oil is your best friend
Seriously, don’t skip this. Lightly coat your hands and tools (like spoons or the butter knife) in neutral oil before working with the marshmallow mixture. It prevents sticking and makes shaping those weird little ovals faster and neater. If you’re letting kids help, give them gloves or silicone hand covers to reduce the mess.
Let the mixture cool slightly
Hot marshmallow mix is ultra-sticky. Let it cool for 2–3 minutes before shaping so it’s firm enough to mold but still flexible. Just don’t wait too long or you’ll have solid brains that are impossible to form.
Make ahead and store smart
These brains last up to a week in an airtight container at room temp. I often prep them two days before Halloween. For maximum freshness, separate layers with wax paper.
Creative Twists for a Killer Halloween Spread
Fruity Flavor Brains
Swap out plain marshmallows for strawberry or raspberry ones. This adds a pink tint and a subtle berry flavor; perfect for kid-friendly Halloween parties. Or add a tiny drop of strawberry essence to the melted mixture.
Stuffed with candy
Want a little surprise inside? Pop a mini chocolate or gummy eyeball in the center of each brain before fully shaping. It’s creepy and fun, especially when guests bite in and find a “bloody” center.
Make them mini
Use a melon baller to shape bite-size brains, ideal for toddlers or party platters.
Go gourmet (grown-up version)
Add a pinch of chili powder to the food coloring for a sweet-spicy contrast. It gives your Halloween brains a little kick and makes them unforgettable. You can also dip the bottom in melted white chocolate for extra richness.
Different color veins
Try using purple or black gel coloring to draw the veins instead of red. It gives a unique spin while still staying spooky. Want a more realistic effect? Use a fine paintbrush and layer colors for dimension.
However you serve them, big or small, mild or spicy, these Marshmallow Rice Bubbles Halloween Brains always get reactions. And honestly? That’s what Halloween baking is all about.
Final Note
If you’ve made it this far, congratulations, you’re officially ready to bring a spooky twist to your Halloween table with these Halloween Brains. They’re messy, weird, a little gross… and totally delicious. With minimal ingredients, no baking required, and tons of customization options, this recipe proves that creepy can also be convenient.
Whether you’re making them for your kids, a school party, or just to get some wide-eyed reactions from friends, these sweet little brains are always a hit. Trust me, if your Halloween desserts get people talking and coming back for seconds, you’re doing it right.
For more easy and satisfying recipes, join me on Pinterest – where good food meets great company!

