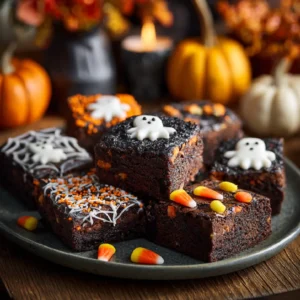
If there’s one thing Halloween brings out in me, it’s the creative cook. And nothing says “festive and fudgy” like a tray of homemade Halloween brownies. Hi, I’m Saly, a home cook who loves recipes that keep it simple but deliver big flavor. This recipe came straight from a lazy October evening when I wanted something spooky for dessert but didn’t want to fuss over it. My husband? He devoured two in one go. These Halloween brownies became a fast favorite. They’re chewy, chocolatey, and ridiculously fun to decorate with spiderwebs, ghosts, or ghoulish sprinkles.
Table of Contents
Why You’ll Love These Halloween Brownies
They’re not just brownies, they’re Halloween brownies. That means chewy centers, shiny crackly tops, and just the right amount of spooky charm. The best part? You don’t need fancy tools or hours in the kitchen to make them look and taste amazing.
Let’s start with texture. These brownies are ultra-fudgy thanks to a base similar to my Black Velvet Halloween Cake batter, rich with cocoa, slightly underbaked for that perfect chew, and packed with chocolate chips. You could even toss in crushed Halloween candies or swirl in peanut butter like I do when I make theseVampire Bite Cupcakes.
What makes them festive is the top: a spiderweb design piped in melted white chocolate or candy melts. It’s simple enough for kids to help with and still impressive enough for party trays. You can even go wild with toppings; mini eyeballs, orange sprinkles, or crushed Oreos.
Need something crowd-pleasing and freezer-friendly? These brownies have your back. Make a big batch, chill them, and decorate later. They slice beautifully, stack easily, and can be made days ahead of your Halloween bash.
Plus, there’s room to customize. Use boxed mix if you’re in a rush. Or go all-in with my scratch recipe below. Either way, you’ll end up with a tray full of chocolate magic and cobweb charm.
Print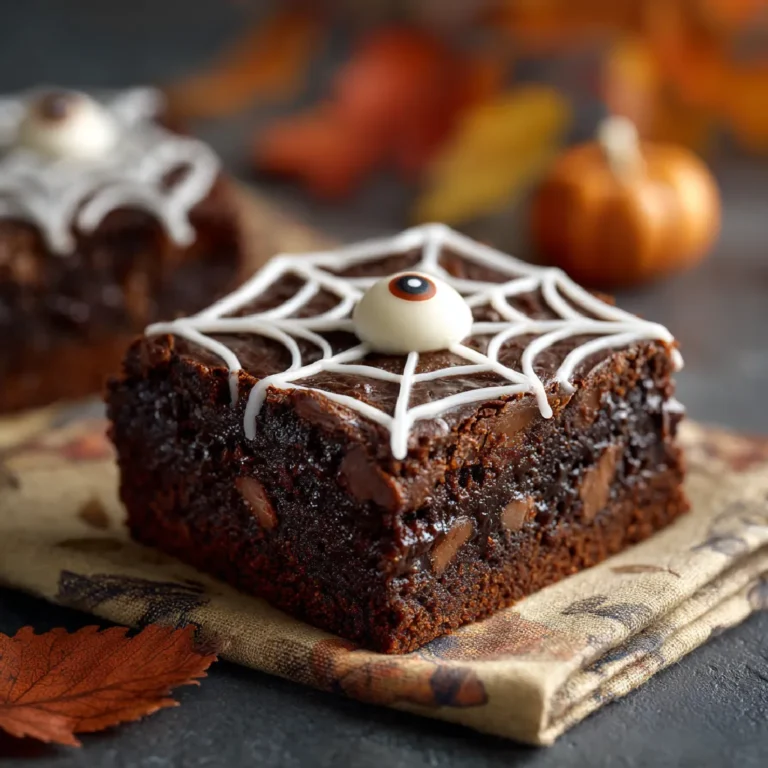
Halloween Brownies
Fudgy, festive Halloween brownies with white chocolate cobwebs, a fun and easy treat for spooky season.
- Total Time: 45 minutes
- Yield: 16 brownies 1x
Ingredients
1/2 cup unsalted butter
1 cup granulated sugar
1/4 cup brown sugar
2 large eggs
1 tsp vanilla extract
1/2 cup unsweetened cocoa powder
1/2 cup all-purpose flour
1/2 tsp salt
1/2 cup chocolate chips
1/3 cup white candy melts (for decoration)
Instructions
1. Preheat oven to 350°F. Line an 8×8-inch metal baking pan with parchment.
2. Melt butter and stir in sugars. Whisk in eggs and vanilla.
3. Add cocoa powder, flour, and salt. Stir until just combined. Fold in chocolate chips.
4. Pour batter into pan and bake for 25–30 minutes. Cool completely.
5. Melt candy melts. Transfer to piping bag and decorate brownies with spiderwebs.
6. Let set before serving or storing.
Notes
Chill brownies before cutting for clean slices.
Use parchment to easily remove brownies from pan.
Store in airtight container up to 5 days.
Freeze undecorated brownies for up to 1 month.
- Prep Time: 15 minutes
- Cook Time: 30 minutes
- Category: Dessert
- Method: Baking
- Cuisine: American
- Diet: Vegetarian
Nutrition
- Serving Size: 1 brownie
- Calories: 210
- Sugar: 20g
- Sodium: 70mg
- Fat: 11g
- Saturated Fat: 6g
- Unsaturated Fat: 4g
- Trans Fat: 0g
- Carbohydrates: 28g
- Fiber: 2g
- Protein: 2g
- Cholesterol: 40mg
Ingredients for the Best Halloween Brownies
Essential Ingredients for Fudgy Halloween Brownies
To make these Halloween brownies truly memorable, you’ll want ingredients that create rich flavor and chewy texture, plus a few Halloween-inspired extras. Here’s what you’ll need:
- Unsalted butter – For richness and that glossy top.
- Granulated sugar – Sweetens and helps with structure.
- Brown sugar – Adds moisture and depth.
- Large eggs – Essential for binding and that fudgy bite.
- Vanilla extract – Always adds warmth to the chocolate base.
- Cocoa powder – Use unsweetened, high-quality cocoa for deep flavor.
- All-purpose flour – Just enough to hold everything together.
- Salt – A pinch balances all the sweet flavors.
- Chocolate chips – Stirred into the batter for melt-in-your-mouth pools.
- White chocolate or candy melts – For that cobweb decoration.
If you’re short on time, a boxed brownie mix works too! Just bake as directed, let cool, and follow the same decorating steps.
Optional Add-ins & Halloween Flair
Want to customize your brownies? Try these fun mix-ins:
- Crushed Halloween candy (like Reese’s pumpkins or M&M’s)
- Swirled peanut butter or Nutella before baking
- Orange or black food coloring in the white chocolate for extra flair
Don’t forget the final touch; decorations! Melted white chocolate makes perfect cobwebs. If you’re feeling fancy, add gummy worms, edible glitter, or candy eyes like the ones I use on my Whoopie Pies. A little creativity goes a long way.
These ingredients are pantry-friendly, budget-conscious, and incredibly versatile; exactly what I love in a festive dessert.
How to Make Halloween Brownies
Step-by-Step Instructions
Making Halloween brownies is as fun as eating them. Whether you’re a beginner or baking with kids, this recipe keeps it easy and festive. Here’s how to make them:
- Preheat your oven to 350°F (175°C). Grease or line an 8×8-inch metal baking pan with parchment.
- Melt the butter in a saucepan or microwave-safe bowl. Stir in the sugars until smooth.
- Whisk in eggs and vanilla until glossy and well combined.
- Sift in cocoa, flour, and salt. Mix until just combined; don’t overmix. Stir in the chocolate chips.
- Spread the batter into your prepared pan. Smooth the top and tap to release any bubbles.
- Bake for 25–30 minutes, or until the edges look set and the center no longer jiggles.
- Cool completely. For clean cuts and easier decorating, chill the brownies in the fridge for 30–60 minutes.
Decorating: Add That Halloween Magic
Now comes the fun part; cobwebs! Melt white candy melts or baking chocolate in the microwave, stirring every 30 seconds. Transfer to a zip-top bag and snip a tiny corner.
To decorate:
- Pipe 4 lines across the brownie like a snowflake.
- Starting near the center, connect the lines with small curved arches to create the web.
- Add a dot in the center or place a mini candy spider for extra Halloween flair.
These brownies hold up well at room temperature for parties, but the cobwebs stay firmer if you chill them slightly before serving. That’s what I did when preparing them alongside these Pumpkin Patch Dirt Cups for last year’s dessert table.
Once decorated, let the cobwebs set completely before storing or serving.
Tips and Variations for Halloween Brownies
Helpful Tips for the Best Results
Even the simplest recipes benefit from a few pro tricks. Here’s how to make sure your Halloween brownies come out picture-perfect every time:
- Use a metal pan, not glass. Glass can cause uneven baking and dry edges. A light-colored metal 8×8-inch pan gives you those chewy edges and soft centers.
- Cool completely before cutting. If you cut too early, the brownies can tear. I chill mine before slicing; it makes decorating so much easier.
- Don’t overmix. Stir just until the flour disappears. Overmixing leads to cakey brownies.
- Line your pan with parchment. It makes cleanup easier and lets you lift the entire batch out to cut neatly.
- Decorate just before serving (or chill first). Especially if using candy melts, the webs set faster and hold their shape better when chilled.
Need these to travel? Stack with parchment between layers in an airtight container; they’ll be fine for up to 3 days at room temperature or 5 days in the fridge.
Fun Halloween Variations
There are so many ways to spook up these brownies. Try these creative twists:
- Spooky shapes: Use cookie cutters to make ghosts, pumpkins, or bats once the brownies cool.
- Color swirl: Add drops of orange food gel to the batter and swirl before baking.
- Creepy toppings: Candy eyes, crushed Oreos, or gummy worms are all welcome here.
You can even turn them into brownie pops by slicing, adding sticks, and dipping in colored candy melts. Every version starts with the same delicious base, it’s up to you how spooky you want to go.
Frequently Asked Questions
Can I make Halloween brownies ahead of time?
Yes! You can bake them up to 3 days in advance. Store undecorated brownies in an airtight container at room temperature. Decorate the day of your event for the freshest look and texture.
What’s the best way to store them?
Keep them in an airtight container. If decorated, layer parchment between brownies to prevent sticking. They last 3 days at room temp or 5 in the fridge.
Can Halloween brownies be frozen?
Absolutely. Freeze the cooled (undecorated) brownies whole or sliced. Wrap in plastic and seal in a freezer bag. They’ll keep for up to a month. Thaw at room temperature, then decorate.
What kind of white chocolate should I use for spiderwebs?
Candy melts or white baking wafers (like Ghirardelli) work best. They harden quickly and pipe smoothly. Avoid white chocolate chips; they often burn or seize up when melted.
Conclusion: A Spooky Sweet Treat Worth Sharing
There’s something extra special about baking during Halloween; the colors, the fun, the chance to turn classic treats into something just a little creepy. These Halloween brownies are everything I love about this season: easy, rich, and just a little playful.
Whether you’re prepping treats for a classroom party, handing out desserts at a Halloween get-together, or just want something sweet for movie night, these brownies won’t disappoint. They’re chewy, crowd-pleasing, and guaranteed to disappear fast; so make a double batch.
For more easy and satisfying recipes, join me on Pinterest – where good food meets great company!
Happy baking and happy haunting!

