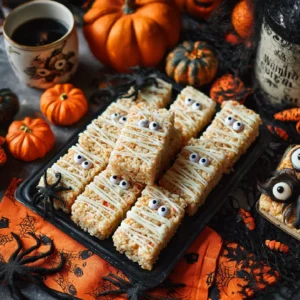
Halloween is the perfect excuse to whip up spooky, sweet, and simple creations; and these Halloween Mummy Treats check all the boxes. With just a handful of ingredients and no baking required, they come together in minutes and disappear even faster. Whether you’re hosting a costume party, packing school lunch boxes, or just need a last-minute dessert, these treats are a guaranteed crowd-pleaser. In this article, we’ll walk through everything you need; from why you’ll love this recipe to ingredients, step-by-step instructions, tips, and variations. So grab your marshmallows, and let’s get creepy in the kitchen.
Table of Contents
Why You’ll Love These Mummy Rice Crispy Treats
If Halloween had a mascot dessert, these adorable mummy rice crispy treats might just win the crown. They’re ridiculously easy to make, fun for kids to decorate, and dangerously delicious for adults to sneak late at night. When I first made these, my husband devoured three before I could even drizzle the white chocolate. That’s when I knew I had a winner.
You don’t need fancy tools or hard-to-find ingredients; just a few pantry staples, a microwave, and a love for spooky fun. These treats come together fast and can be made ahead, making them ideal for Halloween parties or school events.
What really makes this Halloween mummy treats recipe shine is the balance of gooey, crunchy, and sweet. The marshmallow base is buttery and soft with just the right crispiness from the cereal. And when you add the white chocolate bandages and candy eyes? Suddenly, you’ve got a treat that’s both festive and photogenic; perfect for Pinterest, Instagram or your family scrapbook.
They also store well for days, so you can prep them ahead of time. And if you’re already a fan of my Frankenstein Rice Krispie Treats, this spooky spin is a must-try next. Kids love to help with the drizzle and eyes, making it a fun edible craft for the season.
If you’re looking for something that screams “Halloween!” without screaming for hours in the kitchen, these mummy marshmallow rice crispy treats are the perfect solution. Simple. Sweet. Slightly spooky.
Print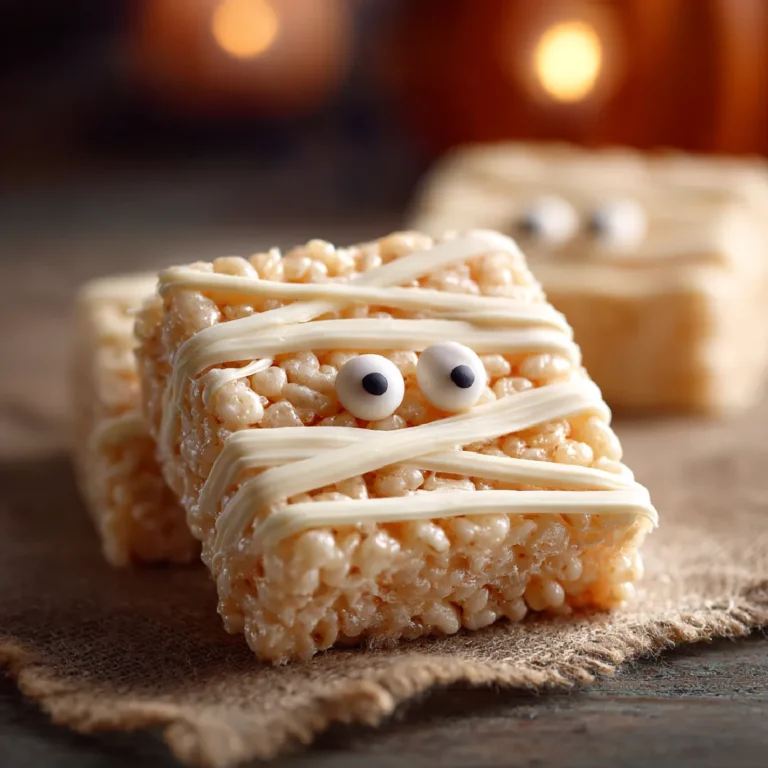
Halloween Mummy Treats
Spooky, sweet, and simple. These Halloween Mummy Treats are fun to make and perfect for parties. Just melt, mix, drizzle, and enjoy!
- Total Time: 10 minutes
- Yield: 12 treats 1x
Ingredients
3 tbsp butter
10 oz mini marshmallows
6 cups crispy rice cereal
½ tsp vanilla extract (optional)
1 cup white chocolate chips or candy melts
Candy eyes
Instructions
1. In a large saucepan, melt butter over low heat.
2. Add mini marshmallows and stir until completely melted.
3. Remove from heat and stir in vanilla extract (if using).
4. Quickly add rice cereal and mix until evenly coated.
5. Press the mixture into a greased or parchment-lined 9×13-inch pan.
6. Cool for 30 minutes, then cut into squares or rectangles.
7. Melt white chocolate in the microwave in 30-second intervals.
8. Drizzle over each treat in a mummy pattern.
9. Place two candy eyes on each treat before the drizzle sets.
10. Let chocolate harden, then serve or store.
Notes
Use colored candy melts for fun variations.
Store in an airtight container for up to 4 days.
For a peanut butter twist, add ¼ cup before the cereal.
- Prep Time: 5 minutes
- Cook Time: 5 minutes
- Category: Dessert
- Method: No-bake
- Cuisine: American
- Diet: Vegetarian
Nutrition
- Serving Size: 1 treat
- Calories: 170
- Sugar: 14g
- Sodium: 90mg
- Fat: 6g
- Saturated Fat: 4g
- Unsaturated Fat: 1.5g
- Trans Fat: 0g
- Carbohydrates: 28g
- Fiber: 0g
- Protein: 1g
- Cholesterol: 10mg
What You’ll Need to Make Halloween Mummy Treats
There’s something satisfying about a treat that doesn’t require a mile-long grocery list or a complicated process. These Halloween Mummy Treats come together with just a few everyday ingredients, many of which you might already have in your pantry. That’s part of what makes them such a go-to recipe for spooky season; minimal effort, maximum payoff.
Here’s what you’ll need:
Basic Ingredients:
- Butter – Just a few tablespoons to help melt the marshmallows smoothly and add richness.
- Mini Marshmallows – These melt easily and create that gooey base we all love in rice crispy treats.
- Rice Cereal – Classic crispy rice cereal works best here. Avoid flavored varieties for the pure vanilla-marshmallow combo.
- White Chocolate or Candy Melts – This is what turns your rice crispy squares into mummies. Drizzle it on for bandages.
- Candy Eyes – You can find these in most baking aisles around Halloween or online. They bring the “mummy” to life.
Optional But Fun:
- Vanilla Extract – A tiny splash adds a warm, comforting depth to the marshmallow mix.
- Sprinkles or Colored Sugar – If you want to get creative, you can add Halloween sprinkles or a shimmer of edible glitter.
This is the same no-bake base I use in my Halloween Brains, which proves how versatile rice crispy treats can be around spooky season.
Ingredient Swap Ideas:
- Allergy-Friendly – Use vegan butter, gluten-free rice cereal, or dairy-free white chocolate to suit dietary needs.
- No Candy Eyes? Try mini chocolate chips, black icing dots, or even sliced raisins for a natural option.
The beauty of these mummy treats lies in their flexibility. They’re fun to personalize and even more fun to eat. You’ll be surprised how something so simple can feel so festive.
How to Make Halloween Mummy Treats (Step-by-Step)
Making these mummy rice crispy treats is as easy as melting, mixing, shaping, and decorating. It’s a no-bake dessert that even your little ghouls can help create, and it all comes together in about 20 minutes, tops.
Step 1: Melt the Marshmallow Base
In a large pot over low heat, melt 3 tablespoons of butter. Once melted, stir in 10 oz of mini marshmallows. Keep stirring until everything is smooth and gooey. For a subtle flavor upgrade, you can add ½ teaspoon of vanilla extract at this stage.
Pro Tip: Keep the heat low to prevent burning the sugars in the marshmallows. You want them melted, not scorched.
Step 2: Add the Rice Cereal
Remove the pot from heat and pour in 6 cups of rice crispy cereal. Use a rubber spatula to gently fold the cereal into the marshmallow mixture until everything is evenly coated. Work quickly; once it cools, it’s harder to shape.
Step 3: Shape and Cool
Transfer the mixture into a greased or parchment-lined 9×13-inch baking dish. Press it down gently to create an even layer. Let it cool for 30 minutes or pop it in the fridge for 15 minutes to speed things up.
Once set, cut into rectangles or squares. These are your mummy “bodies.”
Step 4: Make the Mummies
Melt white chocolate or vanilla candy melts in a microwave-safe bowl (30-second intervals, stirring each time). Transfer it into a piping bag or ziplock bag with the corner snipped off.
Drizzle across the treats in zig-zag patterns to mimic mummy bandages. Immediately place two candy eyes onto each bar before the chocolate sets.
That’s it! You’ve just made your own edible mummies, creepy, cute, and completely delicious. If you’re planning a treat table, they pair frightfully well with these Whoopie Pies for a spooky-themed spread.
Tips and Fun Variations for Mummy Rice Crispy Treats
These Halloween Mummy Treats are already simple and spooky, but with a few smart tips and playful twists, you can make them even more foolproof, or frightfully unique.
Smart Tips for Best Results
- Grease Your Hands or Spatula: The marshmallow mixture is extra sticky. A little butter or nonstick spray on your spatula (or even your fingers) makes pressing it into the pan much easier.
- Don’t Pack It Too Tightly: Gently press the mixture into your pan so your mummy treats stay soft and chewy, not dense.
- Work Fast: Once the marshmallow mixture cools, it gets harder to mold and press, so be ready to go before it sets.
- Let the White Chocolate Cool Slightly Before Drizzling: This helps keep the drizzles thick enough to look like mummy bandages, not runny icing.
Creative Variations to Try
- Colored Mummies: Use colored candy melts (green, purple, orange) for monster-inspired variations. These are especially fun for kids’ parties.
- Flavor Add-ins: Mix a pinch of cinnamon or pumpkin spice into the marshmallow blend for a fall twist.
- Stuffed Mummies: Layer a thin spread of peanut butter or Nutella between two small squares, then drizzle for a “stuffed mummy” variation.
- Mini Mummies: Use a mini muffin tin instead of a pan for bite-sized treats perfect for parties or trick-or-treat bags.
You can also experiment with different cereals like cocoa crispies for a darker mummy look or fruity ones for a rainbow surprise inside.
Looking for a gory twist? Pair them with Bloody Popcorn to create a sweet and scary Halloween snack platter.
Frequently Asked Questions
Can I make these Halloween Mummy Treats ahead of time?
Yes, you can! These mummy rice crispy treats stay fresh for up to 4 days when stored in an airtight container at room temperature. If you’re prepping for a party or school event, feel free to make them a day or two in advance. Just keep them in a cool spot away from direct sunlight to prevent the white chocolate from melting.
How do I keep the rice crispy treats from getting too hard?
Avoid high heat when melting the butter and marshmallows. Stick to low or medium-low heat and stir constantly. Also, don’t overpack the mixture into the pan; press gently so the treats remain soft and chewy.
What can I use if I can’t find candy eyes?
No candy eyes? No problem. You can use mini chocolate chips, black gel icing, raisins, or even tiny dots of melted dark chocolate piped onto the treats. They’ll still look adorably spooky!
Can I freeze Halloween Mummy Treats?
Technically, yes, but it’s not ideal. Freezing changes the texture, and the white chocolate drizzle may crack or “sweat” once thawed. If you must freeze them, wrap each individually and thaw at room temp before serving. For best texture and appearance, enjoy them fresh.
Final Thoughts
These Halloween Mummy Treats are everything I love about seasonal recipes; fun, festive, fast, and absolutely foolproof. They’re the kind of sweet that brings people together: the kids love helping, the grown-ups sneak seconds, and there’s always someone asking, “How did you make these?”
From the soft, gooey base of buttery marshmallow rice crispy treats to the playful mummy decorations with white chocolate drizzle and candy eyes, these no-bake bars are a must-have for any Halloween table. You don’t need fancy skills or tools, just a little time and a love for Halloween magic.
I hope this recipe brings as much joy to your kitchen as it has to ours.
For more easy and satisfying recipes, join me on Pinterest – where good food meets great company!

