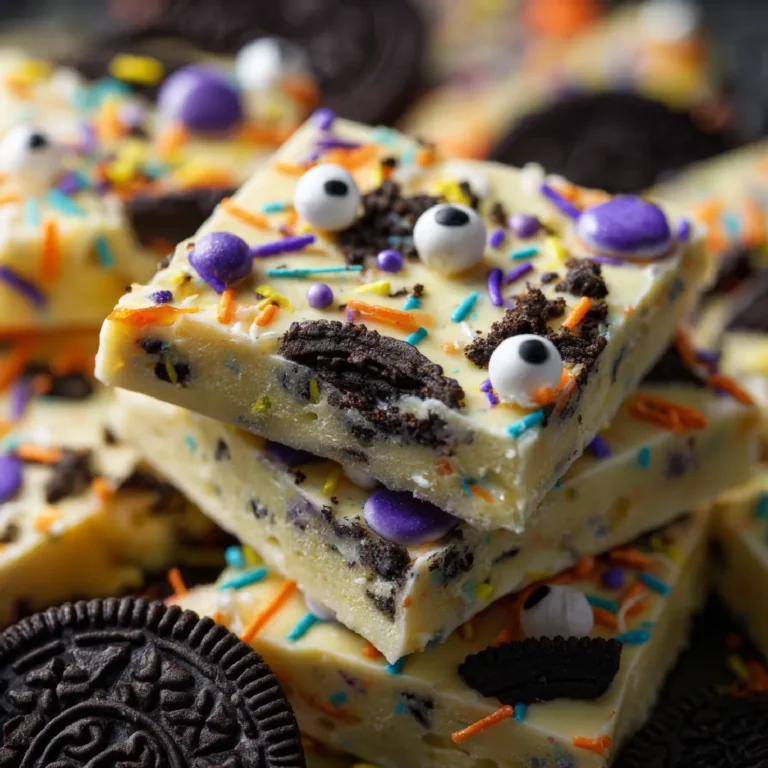
Looking for a no-fuss treat that screams Halloween without haunting your kitchen with cleanup? White Chocolate Halloween Oreo Bark is your perfect monster mash of sweet, spooky, and simple. It’s a fun, no-bake recipe that combines creamy white chocolate, crunchy Oreos, and colorful Halloween candy into one chillingly delightful slab of bark. Whether you’re making party snacks, prepping trick-or-treat bags, or just having fun in the kitchen with your kids, this bark brings flavor and festivity together in minutes. And the best part? No candy thermometer, no baking sheets, just melt, mix, and munch.
Table of Contents
Why You’ll Love This White Chocolate Halloween Oreo Bark
A Spooktacular Treat in Just Minutes
This Halloween Oreo Bark is what I like to call “treat-making magic.” The first time I made it was on a hectic Halloween morning. Costumes weren’t finished, the doorbell wouldn’t stop ringing, and I had zero time for complicated desserts. But my pantry had white chocolate chips, Halloween sprinkles, and half a pack of Oreos. Ten minutes later, we had a chillingly cute bark cooling on the counter, and my husband was already sneaking a corner.
White Chocolate Halloween Bark is fast, festive, and kid-approved. It’s the kind of recipe where everyone gathers around the kitchen island, grabbing toppings, swirling colors, and pretending we’re chocolatiers for the night.
Perfect for Parties and Gifting
Planning a party or hosting trick-or-treaters? This bark makes a spooky statement with its colorful layers and playful toppings. Snap it into shards, bag it up in cellophane, and you’ve got the ultimate edible favor. You can even customize the toppings with your theme with eyeball candies, gummy worms, and pretzel bones; get creative!
Need more Halloween party dessert ideas? These Pumpkin Patch Dirt Cups are another no-bake crowd favorite that pairs perfectly with bark for a kid-friendly dessert table.
Why It Works Every Time
What makes this bark such a star? It doesn’t need baking or fancy tools. Just quality white chocolate, your favorite cookies, and all the creepy-cute toppings your candy drawer can offer. It’s flexible, fun, and totally foolproof.
Print
White Chocolate Halloween Oreo Bark
This white chocolate Halloween Oreo bark is the perfect last-minute spooky treat. No baking, no fuss; just melt, mix, and chill. Great for parties, gifting, or a fun kitchen activity with the kids.
- Total Time: 35 minutes
- Yield: 10 servings 1x
Ingredients
12 oz white chocolate chips (or bars)
10 Halloween Oreo cookies, chopped
1 cup Halloween candy mix
2–3 tbsp Halloween sprinkles
Optional: candy eyeballs, pretzels, or mini marshmallows
Instructions
1. Melt the white chocolate in a microwave-safe bowl in 30-second intervals until smooth.
2. Line a baking sheet with parchment paper.
3. Pour and spread melted chocolate evenly into a thin rectangle.
4. Sprinkle chopped Oreos, candy, and toppings on top.
5. Press gently so they stick.
6. Chill for 30 minutes until firm.
7. Break into pieces and serve.
Notes
Store in an airtight container for up to 2 weeks.
Customize with your favorite candies or sprinkles.
- Prep Time: 5 minutes
- Cook Time: 0 minutes
- Category: Halloween Desserts
- Method: No-Bake
- Cuisine: American
- Diet: Vegetarian
Nutrition
- Serving Size: 1 piece
- Calories: 220
- Sugar: 18g
- Sodium: 95mg
- Fat: 12g
- Saturated Fat: 7g
- Unsaturated Fat: 3g
- Trans Fat: 0g
- Carbohydrates: 25g
- Fiber: 1g
- Protein: 2g
- Cholesterol: 5mg
Ingredients for Halloween Oreo Bark
Simple Ingredients, Spooky Results
What’s amazing about White Chocolate Halloween Oreo Bark is that it starts with just a few pantry staples, but the end result looks like you spent hours. The base is creamy white chocolate, which creates the perfect sweet canvas for crunchy Oreo chunks and Halloween candy galore.
Here’s what you’ll need to bring this bark to life:
| Ingredient | Amount |
|---|---|
| White chocolate chips or bars | 12 oz (about 2 cups) |
| Halloween Oreo cookies | 10, roughly chopped |
| Halloween candy mix (M&Ms, candy corn, etc.) | 1 cup total |
| Halloween sprinkles | 2–3 tablespoons |
| Optional: candy eyeballs, pretzels, marshmallows | As desired |
Ingredient Notes and Substitutes
- White Chocolate: Use good-quality chips or bars that melt smoothly. Avoid almond bark or candy melts unless you prefer a less creamy texture.
- Oreos: The seasonal Halloween Oreos with orange filling are ideal, but any variety works. Even crushed chocolate sandwich cookies will do.
- Toppings: Mix and match! Add gummy worms for a “graveyard” vibe or mini marshmallows for a ghostly twist.
If you’re working with kids in the kitchen, you might also enjoy these Frankenstein Rice Krispie Treats; another playful, sweet treat that’s as fun to decorate as it is to eat.
How to Make White Chocolate Halloween Oreo Bark
Melt, Mix, and Magic
Making Halloween Oreo Bark is as simple as melt, pour, and sprinkle. You won’t need a candy thermometer, piping bags, or baking trays. Just your microwave, a spatula, and a baking sheet lined with parchment paper.
Here’s how to bring your spooky bark to life in under 15 minutes (plus chilling time):
- Melt the White Chocolate
In a microwave-safe bowl, heat the white chocolate chips in 30-second bursts, stirring between each, until smooth. It usually takes about 1½ to 2 minutes. Be careful not to overheat; white chocolate seizes easily. - Prepare the Base
Line a baking sheet or flat tray with parchment paper. Pour the melted white chocolate onto the paper and use a spatula to spread it evenly into a thin rectangle; about ¼ inch thick. - Sprinkle the Magic
While the chocolate is still warm, scatter the chopped Halloween Oreos over the top. Add candy pieces, sprinkles, candy eyeballs, or anything else fun and festive. Press gently to ensure the toppings stick. - Chill Until Set
Place the tray in the fridge for about 30 minutes, or until the bark is completely firm. - Break Into Pieces
Once set, lift the bark from the tray and use your hands or a knife to break it into jagged shards.
Need a savory break from all that sweet? Try pairing this treat with these creepy-good Cheeseburger Skulls for a full spooky meal lineup.
Make-Ahead Friendly
This white chocolate Halloween bark stores well for up to two weeks in an airtight container. Keep it cool to avoid melting, and to keep little hands from grabbing it all before your guests arrive.
Tips and Variations for Halloween Bark Success
Avoid Common Mistakes with These Easy Fixes
While White Chocolate Halloween Bark is super simple, there are a few tricks to keep in mind so your treat turns out perfect every time:
- Use dry toppings only. Moisture from gummy candies or fresh fruit can make the chocolate seize or sweat. Stick to dry toppings like sprinkles, candy-coated chocolates, and chopped cookies.
- Melt slowly. Always melt white chocolate in short bursts, stirring well. High heat causes it to clump or burn.
- Line your tray well. Parchment paper or wax paper ensures easy release; no scraping required.
- Work quickly. The chocolate starts setting fast, so have your toppings ready before you pour.
Get Creative with Halloween Bark Variations
This Halloween Oreo Bark is the ultimate “make-it-your-own” treat. Here are a few spooky spins you can try:
- Monster Mash-Up: Add green candy melts swirled into the white chocolate for a slime-inspired effect. Drop candy eyeballs for a true “creature feature.”
- Bloody Bark: Swirl red gel food coloring or drizzle red candy melts for a vampire bite look. This works great alongside Bloody Red Velvet Popcorn on your spooky table.
- Glow-in-the-Dark Effect: Use neon sprinkles or glow candies for a UV-reactive treat; perfect for blacklight parties.
- Pumpkin Patch Bark: Add candy pumpkins and crushed graham crackers for a harvest twist.
Make It a Party Activity
Turn this recipe into an interactive Halloween activity! Set up a “bark bar” where guests can choose their toppings, pour melted chocolate onto personal-sized sheets, and create their own creepy creations. Great for kids’ parties or spooky sleepovers.
Frequently Asked Questions
Can I make Halloween bark ahead of time?
Yes! You can make White Chocolate Halloween Bark up to two weeks in advance. Once it’s fully set and broken into pieces, store it in an airtight container in a cool, dry place. Refrigeration is optional but helps maintain the texture, especially in warmer climates.
What’s the best chocolate to use for Halloween Oreo bark?
Use high-quality white chocolate chips or bars that are labeled for melting. Avoid white candy melts unless you prefer a waxier texture. Real white chocolate will give the bark a creamy finish and better flavor.
Can I freeze Halloween bark?
Yes, but it’s not always necessary. If you need to store it longer, freeze it between layers of parchment paper in an airtight container. Let it thaw in the fridge to avoid condensation that can affect texture and appearance.
How do I keep Halloween bark from cracking too much?
Don’t worry, cracks are part of the charm! But to minimize crumbling, make sure your chocolate layer isn’t too thin and allow it to chill completely before breaking. Use your hands to snap it gently instead of a knife if you want bigger pieces.
Final Thoughts
White Chocolate Halloween Oreo Bark is proof that easy can still be exciting. It’s a no-bake recipe that delivers festive flair, bold crunch, and irresistible sweetness in just minutes. Whether you’re throwing a Halloween bash or just need a last-minute treat, this bark has your back.
What I love most? It’s a recipe that invites creativity. Swap candies, change the colors, add a drizzle or a crunch. No matter how you break it, this Halloween bark always delivers smiles and second helpings.
For more easy and satisfying recipes, join me on Pinterest – where good food meets great company!


